Now we’re going to follow the initial design I laid out here. We already have networking provisioned, so next step will be to use OCI Console and provision our OCI Network Firewall. Once we’ve provisioned it, I’ll see what happens with traffic when it hits the firewall.
Final post of this series will be then on allowing traffic through the firewall and validating it works as expected.
Provisioning
Before we can provision the OCI Network Firewall, we need to have a policy created for the firewall. I’m just creating an empty policy which I’ll attach to the firewall. More on policies later!

Creating a policy without any rules takes just few seconds, after that I’ll navigate to network firewalls, select correct compartment and click create network firewall.
After clicking I get a screen where I will choose name, policy and enforcement point. As you can see from below screenshot, I’ll choose my private subnet as a target. I’m only choosing to deploy it in a single availability domain in the region just to show the feature is there, I’m using ca-toronto-1 which is a single AD region anyway!

Create Network Firewall
After clicking, I get a screen which says the creation will take around 30 minutes to complete.

Once the Network Firewall show up as provisioned, I’m ready to perform my testing.
But wait! How do I see if my traffic is being hit the firewall? There’s one additional step you want to do before, enable firewall logs. When you navigate to firewall, on bottom left you can see Logs. Go there and enable Traffic Log as you can see below. Traffic Log will provide details on any traffic passing the firewall.
If you don’t have an existing Log Group, there will be an option to create it.
You can see also Threat Log which can be enabled which provides details on any threats detected by the firewall.

Enable logging for the firewall
Testing connectivity
Remember that we had empty policy #1 assigned, I have a compute instance in my-another-vcn which I will want to reach out to public internet. Now when we have an empty policy assigned, all traffic should be denied. Let’s see.
[opc@server1 ~]$ curl https://www.thatfinnishguy.blog
curl: (7) Failed to connect to www.thatfinnishguy.blog port 443: Connection refused
[opc@server1 ~]$ traceroute www.thatfinnishguy.blog
traceroute to www.thatfinnishguy.blog (35.207.97.64), 30 hops max, 60 byte packets
 1  * * *
 2  10.200.0.223 (10.200.0.223)  2.086 ms !X  1.824 ms !X  1.414 ms !X
[opc@server1 ~]$
I tried to access this blog from the server and also ran a traceroute afterwards. As you can see, traffic stops on the firewall. We should see this in the firewall logs as well.
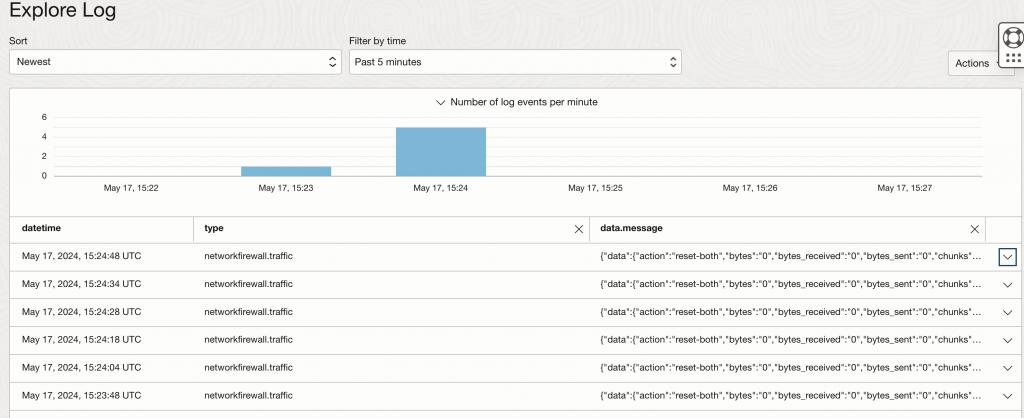
I see data getting to firewall, looking on one of the rows in detail I see it uses default-deny-all rule as expected. There’s also bunch of data associated with each message which is good for any monitoring or debugging.
{
  "datetime": 1715959488000,
  "logContent": {
    "data": {
      "action": "reset-both",
      "bytes": "0",
      "bytes_received": "0",
      "bytes_sent": "0",
      "chunks": "0",
      "chunks_received": "0",
      "chunks_sent": "0",
      "config_ver": "2561",
      "device_name": "PA-VM",
      "dport": "443",
      "dst": "35.207.97.64",
      "dstloc": "Germany",
      "firewall-id": "ocid1.networkfirewall.oc1.ca-toronto-1.amaaaaaahrvsn4yah5tgjhxoy2lbrxxxxhbwtpwegqvqa6fawxxxttrtwq",
      "packets": "1",
      "parent_session_id": "0",
      "pkts_received": "0",
      "pkts_sent": "1",
      "proto": "tcp",
      "receive_time": "2024/05/17 15:24:48",
      "rule": "default-deny-all",
      "rule_uuid": "77e6e470-f7f6-49be-884a-660227a8917e",
      "serial": "19FFCBC4660F058",
      "sessionid": "0",
      "sport": "49952",
      "src": "10.0.1.238",
      "srcloc": "10.0.0.0-10.255.255.255",
      "time_received": "2024/05/17 15:24:48",
      "tunnelid": "0"
    },
    "id": "fa27f264-8ca3-4352-a507-8e1ee741ee23",
    "oracle": {
      "compartmentid": "ocid1.compartment.oc1..aaaaaaaacizywaohwmsyu4qq6q4djdq2nfbxr5iwh4l3kyxuixxx7b7gnjq",
      "ingestedtime": "2024-05-17T15:25:04.900Z",
      "loggroupid": "ocid1.loggroup.oc1.ca-toronto-1.amaaaaaahrvsn4yaw3au57wihpu5eucfyjmuvlx673orjoe3sczq4bfybxuq",
      "logid": "ocid1.log.oc1.ca-toronto-1.amaaaaaahrvsn4ya3hqyb35wcu2qv5yib5fnk7re2upud23l7euoyalluciq",
      "tenantid": "ocid1.tenancy.oc1..aaaaaaaaifdc6yfeidyal7iup5wh6gguxxxxxxxxx"
    },
    "source": "ocid1.networkfirewall.oc1.ca-toronto-1.amaaaaaahrvsn4yah5tgjhxoy2lbraihphbwtpwegqvqa6fawzkrs4ttrtwq",
    "specversion": "1.0",
    "time": "2024-05-17T15:24:48.000Z",
    "type": "com.oraclecloud.networkfirewall.traffic"
  },
  "regionId": "ca-toronto-1"
}
Summary
Provisioning is made really easy with OCI Network Firewall, if you have done for example native Palo Alto deployment on OCI, you know it’ll take way more time to get everything setup. Still with both approaches, I feel the overall design and routing is majority of work before starting to apply policies.
In the next post, we’ll look on how to configure policies and apply them on the firewall and validate we can reach out to public internet as expected.
Important links:
thanks for the sharing really helping me to configure oci network firewall in future