On part 2 for OVM 3.4.2 I’ll show how to configure OVM up to running speed so you can create VM’s. It’s again really straightforward and doesn’t need much previous (or at all) knowledge.
Networking
As we use iSCSI for our storage I need to add our iSCSI networks to OVM and link them to corresponding NIC’s on OVS.

As you can see above I have already added our storage networks to OVM. You can have different networks for different functions (Management, Cluster Heartbeat, Live migrate, Storage and Virtual Machines). Depending for example if you need to do lot of live migrations between physical servers you might want to separate that.
We don’t do that too often so usually we have combined Management, Cluster Heartbeat and Live Migrate and haven’t seen issues with that. But probably if you have large installation with hundreds of servers you might want to consider separating these.

Here you can see one of the storage networks being configured. You need to give it a name and then define the use.

And then link all the necessary ports to this network from the OVS servers. What usually happens for me is that since you have two interfaces with similar names (p3p1, p3p2) you will assign them to wrong network and then need to redo the IP addressing. You can quickly see if its assigned correctly by logging into OVS and trying to ping your SAN interface.
If you use 10GbE iSCSI remember to configured MTU (jumbo frames)!
After this has been done correctly and you have interfaces up you can add storage connection to OVM.
Storage
For storage you need to establish connection to your storage system. As we use iSCSI SAN we just need to discover new SAN server and configure it.
First select name for your storage and define correct plugin for connection.

For me I just need to pick the generic SCSI plugin. On the next tab I define connection to SAN and add the connection details there.

I added two connections so both iSCSI networks are used. Finally you need to add Admin servers which can rescan added disks or do any other maintenance operations for added disks. With iSCSI network we always add all servers in the server pools.

After this is done verify from your SAN that the added server is visible (iSCSI connector).
Server pools and required storage
By default you should be good adding two disks from SAN to your server pool which I’m going to create shortly.
Cluster pool file system: This is to store your cluster data and also for your cluster heartbeat. We usually set this to 20GB
Repository file system: This is where your server pool VM images and ISOs etc will be stored. This depends how big server pool you will have and how you plan to use it. 500GB is usually good to start with. You have option to increase it later or create additional repositories if needed.
I’ve already added one 12GB and one 500GB disk from our SAN to be discovered by OVM.
Click refresh SAN server and once disks are found change the default names immediately. Otherwise you risk having multiple disks with generic names.

Server pool
Now I will create server pool for our OVM. Server pool can be one-or-many OVS servers which share repositories (you can share repositories also between server pools) and you can perform live migration for VMs between OVS servers in same server pool.
So you can share resources in your server pool with those VMs you have there. We for example group our pools between databases and applications for test and production.
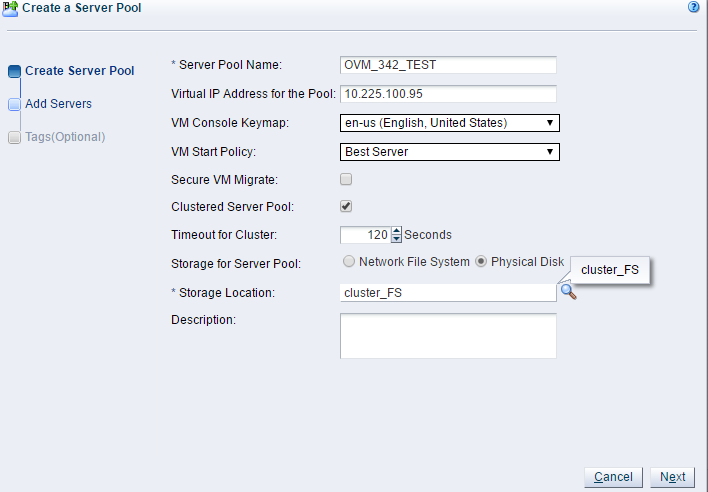

You will need one free IP address to be assigned to each server pool. I selected previously added 12GB disk for cluster filesystem. After this you assign those OVS servers which you want on this server pool.
Next I still need to add repository disk for my server pool. After that we are done with the initial setup.
From the repositories tab I click add new repository and add the previously created 500Gb disk.

Now you assign repository to correct OVS servers and you have the repository layout done and are ready to start creating VMs!
OVM creates default folder structure for repository where corresponding files and images will be assigned.

And logging onto the OVS I can see same structure is available on the server.
[root@OVS1 ~]# df -h
Filesystem Size Used Avail Use% Mounted on
/dev/sda2 50G 1.6G 46G 4% /
tmpfs 498M 0 498M 0% /dev/shm
/dev/sda1 477M 93M 355M 21% /boot
none 498M 40K 498M 1% /var/lib/xenstored
/dev/mapper/36000d310003d17000000000000000b6a
 12G 369M 12G 3% /poolfsmnt/0004fb000005000035b0568506b0366e
/dev/mapper/36000d310003d17000000000000000b6b
 500G 5.6G 495G 2% /OVS/Repositories/0004fb00000300004329fe08bc8a01a5

[root@OVS1 0004fb00000300004329fe08bc8a01a5]# ls -la
total 33
drwxr-xr-x 8 root root 3896 Dec 15 14:05 .
drwx------ 3 root root 4096 Dec 15 14:10 ..
drwx------ 2 root root 3896 Dec 15 14:05 Assemblies
drwx------ 2 root root 3896 Dec 15 14:05 ISOs
drwxr-xr-x 2 root root 3896 Dec 15 14:05 lost+found
-rw------- 1 root root 152 Dec 15 14:05 .ovsrepo
drwx------ 2 root root 3896 Dec 15 14:05 Templates
drwx------ 2 root root 3896 Dec 15 14:05 VirtualDisks
drwx------ 2 root root 3896 Dec 15 14:05 VirtualMachines
Now all initial setup is done. On part 3 I will migrate one VM template and create VM from that template.